0%

Github+Hexo搭建博客(4)—next7.5主题个性化1

1.在右上角或者左上角实现fork me on github

实现效果图

具体实现方法
点击这里或者这里挑选自己喜欢的样式,并复制代码。

然后粘贴代码到themes/next/layout/_layout.swig文件中如下位置,并把href改为你的github地址。

2.主页文章添加阴影效果

实现效果图

具体实现方法
由于next7.5没有预留_custom文件夹,使用其injects注册器自定义样式实现阴影效果,步骤如下,
在myblog\source下新建_data文件夹,新建styles.styl文件,添加以下代码,

1
2
3
4
5
6
7
8
9
10
11
12
// 主页文章添加阴影效果 
.article {
margin-top: 60px;
margin-bottom: 60px;
padding: 25px;
-webkit-box-shadow: 0 0 5px rgba(202, 203, 203, .5);
-moz-box-shadow: 0 0 5px rgba(202, 203, 204, .5);
//发光阴影-webkit-box-shadow: -1px 0 20px #3B3B3B, 1px 0 20px #3B3B3B, 0 -1px 20px #3B3B3B, 0 1px 20px #3B3B3B
//发光阴影-moz-box-shadow: -1px 0 20px #3B3B3B, 1px 0 20px #3B3B3B, 0 -1px 20px #3B3B3B, 0 1px 20px #3B3B3B
//-webkit-box-shadow: 0 4px 8px 0 rgba(0, 0, 0, 0.2), 0 6px 20px 0 rgba(0, 0, 0, 0.19);//设置两层阴影
//-moz-box-shadow: 0 4px 8px 0 rgba(0, 0, 0, 0.2), 0 6px 20px 0 rgba(0, 0, 0, 0.19);//设置两层阴影
}

然后在myblog的_config.yml文件中进行如下配置,

1
2
3
4
5
6
7
8
9
10
11
custom_file_path:  
#head: source/_data/head.swig
#header: source/_data/header.swig
#sidebar: source/_data/sidebar.swig
#postMeta: source/_data/post-meta.swig
#postBodyEnd: source/_data/post-body-end.swig
#footer: source/_data/footer.swig
#bodyEnd: source/_data/body-end.swig
#variable: source/_data/variables.styl
#mixin: source/_data/mixins.styl
style: source/_data/styles.styl

最后打开主题文件下\scripts\filters添加注射器如下,

1
2
3
hexo.extend.filter.register('theme_inject', function(injects) { 
injects.style.push('source/_data/styles.styl');
});

经过该步操作,很多教程修改_custom.styl的操作都可以通过修改style.styl实现,另外很多修改_layout.styl等原配置文件的操作都建议通过修改style.styl文件实现,这样避免修改源代码,也方便查找自定义的修改。

3.添加动态背景

实现效果图

具体实现方法
原则上说,next7.5版本只需要修改next的_config.yml配置文件即可实现,但是我没有成功,所以还是按照以下步骤实现。

1). 打开next/layout/_layout.swig,在< /body>之前添加代码(注意不要放在< /head>的后面)。

1
2
3
{% if theme.canvas_nest %}
<script type="text/javascript" src="//cdn.bootcss.com/canvas-nest.js/1.0.0/canvas-nest.min.js"></script>
{% endif %}

2). 打开/next/_config.yml,修改如下代码。

1
2
3
4
# background settings
# add canvas-nest effect
# see detail from https://github.com/hustcc/canvas-nest.js
canvas_nest: true

3). 如果你觉得默认线条数量太多了,可以修改线条数量。在上一步修改_layout.swig中,把代码

1
2
3
{% if theme.canvas_nest %}
<script type="text/javascript" src="//cdn.bootcss.com/canvas-nest.js/1.0.0/canvas-nest.min.js"></script>
{% endif %}

改为

1
2
3
4
{% if theme.canvas_nest %}
<script type="text/javascript"
color="0,0,255" opacity='0.7' zIndex="-2" count="99" src="//cdn.bootcss.com/canvas-nest.js/1.0.0/canvas-nest.min.js"></script>
{% endif %}

4). 配置项说明

  • color:线条颜色,默认:'0,0,0';三个数字分别为(R,G,B)
  • opacity:线条透明度(0~1),默认:0.5
  • count:线条的总数量,默认:150
  • zIndex:背景的z-index属性,css属性用于控制所在层的位置, 默认:-1

4.实现点击出现桃心效果

实现效果图

具体实现方法
把js文件love.js点我下载放在\themes\next\source\js\src目录(保证文件目录跟下面代码中引入目录相同即可)下,修改\themes\next\layout_layout.swig文件,在末尾(在前面引用会出现找不到的 bug)添加以下js引入代码。

1
2
<!-- 页面点击小红心 --> 
<script type="text/javascript" src="/js/src/love.js"></script>

5.修改文章内链接文本样式

实现效果图

具体实现方法
修改themes\next\source\css_common\components\post\post.styl文件,在末尾添加如下css代码,

1
2
3
4
5
6
7
8
9
10
11
// 文章内链接文本样式 
.post-body p a{
color: #0593d3;
border-bottom: none;
border-bottom: 1px solid #0593d3;
&:hover {
color: #fc6423;
border-bottom: none;
border-bottom: 1px solid #fc6423;
}
}

其中选择.post-body是为了不影响标题,选择p是为了不影响首页“阅读全文”的显示样式,颜色可以自己定义。

6.在文章末尾统一添加“本文结束”标记

实现效果图

具体实现方法
在\themes\next\layout_macro目录新建passage-end-tag.swig文件,并添加以下代码,

1
2
3
4
5
6
7
<div>     
{% if not is_index %}
<div style="text-align:center;color: #ccc;font-size:14px;">
-------------本文结束<i class="fa fa-paw"></i>感谢您的阅读-------------
</div>
{% endif %}
</div>

接着打开\themes\next\layout_macro\post.swig文件,在post-body之后,post-footer之前添加代码,

1
2
3
4
5
<div>   
{% if not is_index %}
{% include 'passage-end-tag.swig' %}
{% endif %}
</div>

然后打开主题配置文件themes\next_config.yml,在末尾添加代码,

1
2
3
# 文章末尾添加“本文结束”标记 
passage_end_tag:
enabled: true

完成以上设置之后,在每篇文章之后都会添加如上效果图。

7.修改作者头像并旋转

实现效果图

具体实现方法
修改next的配置文件_config.yml如下,

1
2
3
4
5
6
7
# Sidebar Avatar avatar:  
# Replace the default image and set the url here.
url: /images/avatar.jpg
# If true, the avatar would be dispalyed in circle.
rounded: true
# If true, the avatar would be rotated with the cursor.
rotated: true

8.侧边栏社交小图标设置

实现效果图

具体实现方法
打开主题配置文件_config.yml,搜索social_icons:,在图标库找自己喜欢的小图标,并将名字复制在如下位置,保存即可。

1
2
3
4
5
6
7
8
9
10
11
12
social:  
GitHub: https://github.com/xtlei/xtlei.github.io.git || github
E-Mail: mr.xietonglei@foxmail.com || envelope
#Weibo: https://weibo.com/yourname || weibo
#Google: https://plus.google.com/yourname || google
#Twitter: https://twitter.com/yourname || twitter
#FB Page: https://www.facebook.com/yourname || facebook
#VK Group: https://vk.com/yourname || vk
#StackOverflow: https://stackoverflow.com/yourname || stack-overflow
#YouTube: https://youtube.com/yourname || youtube
#Instagram: https://instagram.com/yourname || instagram
#Skype: skype:yourname?call|chat || skype

9.添加RSS

实现效果图

具体实现方法
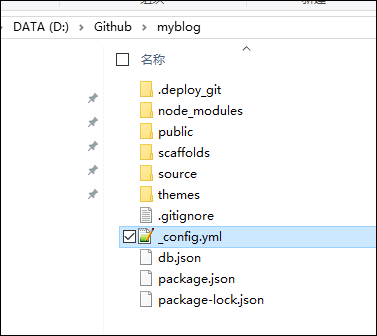
切换到myblog的根目录。然后使用终端安装Hexo插件:(插件会放在node_modules文件夹)

1
npm install --save hexo-generator-feed

接下来打开myblog文件夹下的_config.yml文件,如下图:

在里面的末尾添加:(请注意在冒号后面要加一个空格,否则报错!)

1
2
3
# Extensions 
## Plugins: http://hexo.io/plugins/
plugins: hexo-generate-feed

然后打开next主题文件夹里面的_config.yml,在里面配置如下。(就是在rss:的后面加上/atom.xm,注意在冒号后面要加一个空格)

1
2
3
4
# Set rss to false to disable feed link. 
# Leave rss as empty to use site's feed link.
# Set rss to specific value if you have burned your feed already.
rss: /atom.xml

配置完之后运行 hexo g 重新生成一次,在./public文件夹中生成atom.xml文件,然后启动服务器查看是否有效,之后再部署到Github中。

10.添加README.md文件

每个项目下一般都有一个README.md文件,但是使用hexo部署到仓库后,项目下是没有README.md文件的。
在Hexo目录下的source根目录下添加一个README.md文件,修改站点配置文件_config.yml,将skip_render参数的值设置为,

1
skip_render: README.md

保存退出即可。再次使用hexo d命令部署博客的时候就不会在渲染 README.md这个文件了。

11.设置网站的图标Favicon

实现效果图

具体方法实现
EasyIcon中找一张(32*32)的ico图标,或者去别的网站下载或者制作,并将图标名称改为favicon.ico,然后把图标放在/themes/next/source/images目录,并且修改主题配置文件,

1
2
# Put your favicon.ico into `hexo-site/source/` directory. 
favicon: /favicon.ico

12.文章多个标签多级分类

1
2
3
4
5
6
title: Git使用中的报错情况
date: 2017-03-11 23:54:11
tags: [git,实战经验]
categories:
- 软件开发(一级分类)
- Others(二级分类)

原文链接:http://shenzekun.cn/
     https://blog.ynxiu.com/2016/hexo-next-theme-optimize.html
     http://shenzekun.cn/

天生我材必有用,千金散尽还复来~
  • 本文作者: XTLei
  • 版权声明: 本博客所有文章除特别声明外,均采用 BY-NC-SA 许可协议。转载请注明出处!
-------------本文结束感谢您的阅读-------------